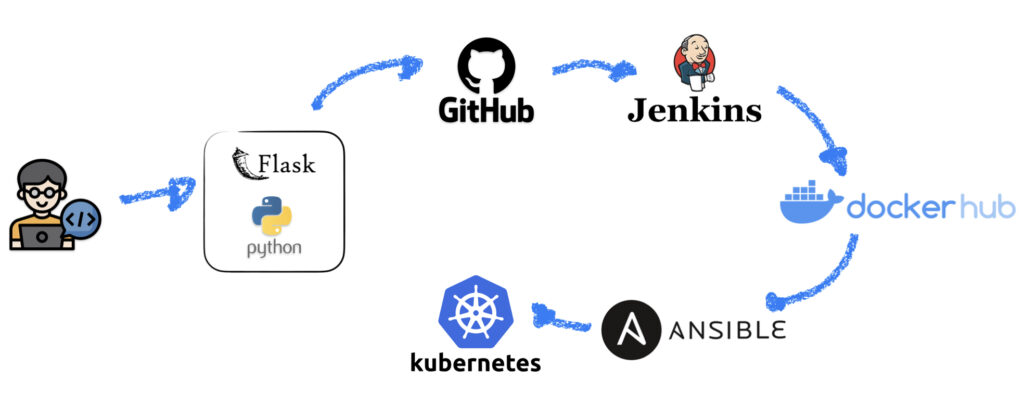
Jenkins
So let’s install Jenkins on the server02 by following the Jenkins Documentation, it’s pretty simple.
curl -fsSL https://pkg.jenkins.io/debian-stable/jenkins.io-2023.key | sudo tee \
  /usr/share/keyrings/jenkins-keyring.asc > /dev/null
echo deb [signed-by=/usr/share/keyrings/jenkins-keyring.asc] \
  https://pkg.jenkins.io/debian-stable binary/ | sudo tee \
  /etc/apt/sources.list.d/jenkins.list > /dev/null
sudo apt-get update
sudo apt-get install jenkins
After the installation completes we need to enable and start Jenkins.
sudo systemctl enable jenkins
sudo systemctl start jenkins
sudo systemctl status jenkins
Ok, we confirmed that the service is up and running.
Now type the following to get the initial admin password and note it down.
sudo cat /var/lib/jenkins/secrets/initialAdminPassword
Now enter on your browser http://server02:8080/ and unlock it with the password above.

Now follow the prompts installing the suggested plugins and complete the wizard.
Jenkins Node
Now let’s configure a Jenkins Node to run our pipelines although it is not mandatory to configure a node it is recommended to build on nodes instead of the Jenkins server itself.
Click on Manage Jenkins and them Nodes and Clouds.
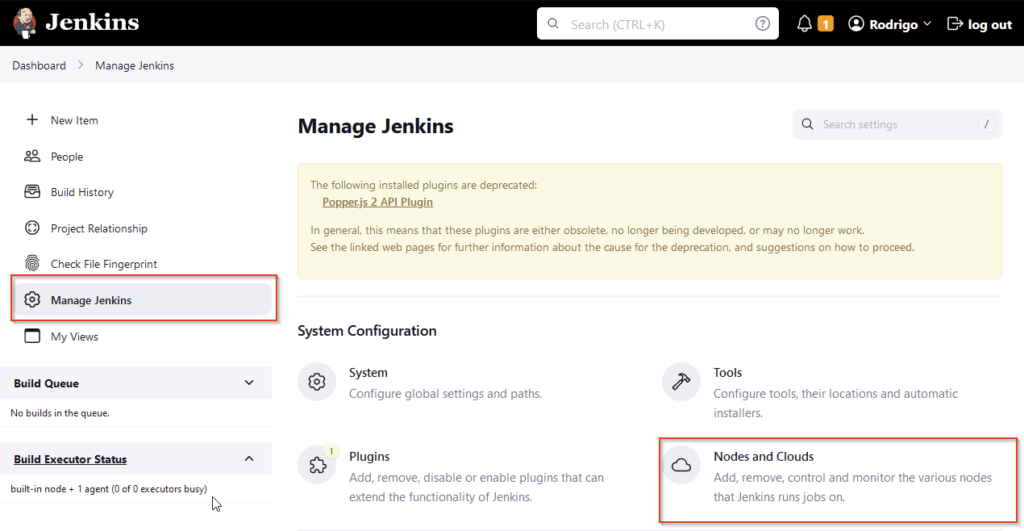
Them add a New Node.

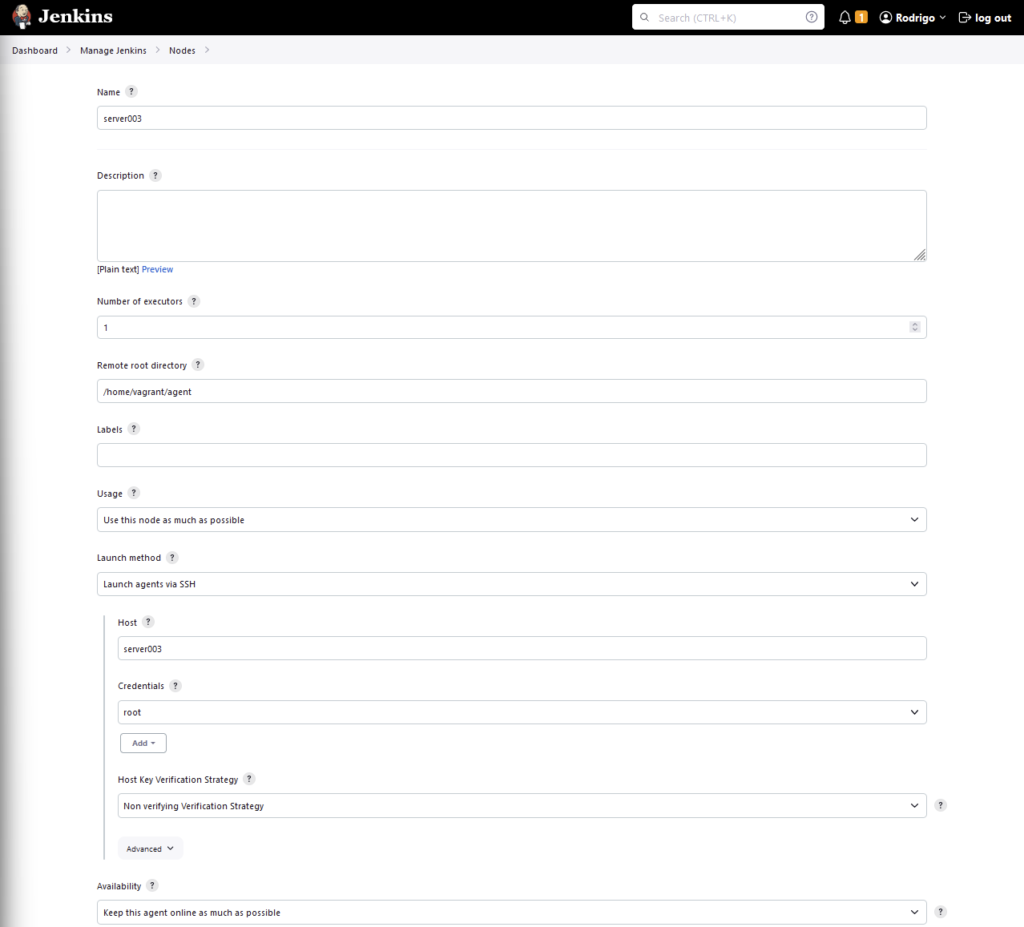
Enter the node name and select Permanent type, enter the Remote root directory, this is where Jenkins will use as the build directory, I prefer to use the home directory but one level down, so something like this: /home/vagrant/agent
For usage, select Use this node as much as possible.
Launch method, select Launch agents via SSH.
Host: enter the hostname of the agent node and provide the credentials to connect to the SSH of the server node.
So we will get something like this.
And we now should see our agent node ready.

Jenkins Node Configuration
Make sure to install Docker and Ansible on the Jenkins Node and configure passwordless SSH authentication between the Jenkins node and the Kubernetes cluster, refer to this post, we are going to need them to build our pipeline.
Also, run sudo pip install --upgrade --user openshift and upload the .kube folder from the Kubernetes Control Plane to the /root folder of the node to allow Ansible to run Kubernetes tasks.

Jenkins x GitHub Integration
Now, lets make Jenkins to fetch our code from GitHub and build our pipeline, first we need to authenticate our Jenkins server to our GitHub project by using a deploy key.
SSH to the Jenkins server and run ssh-keygen -t ed25519 -C "<your_email>" and select where you want to store the public and private key files.
In the directory you should see two files, one with .pub extension, that is the public key and this the one we will use on GitHub.

Get the contents of both files and go to the GitHub repository, click on Settings, Deploy Keys and add a new deploy key and paste the contents of the public key you retrieved before.

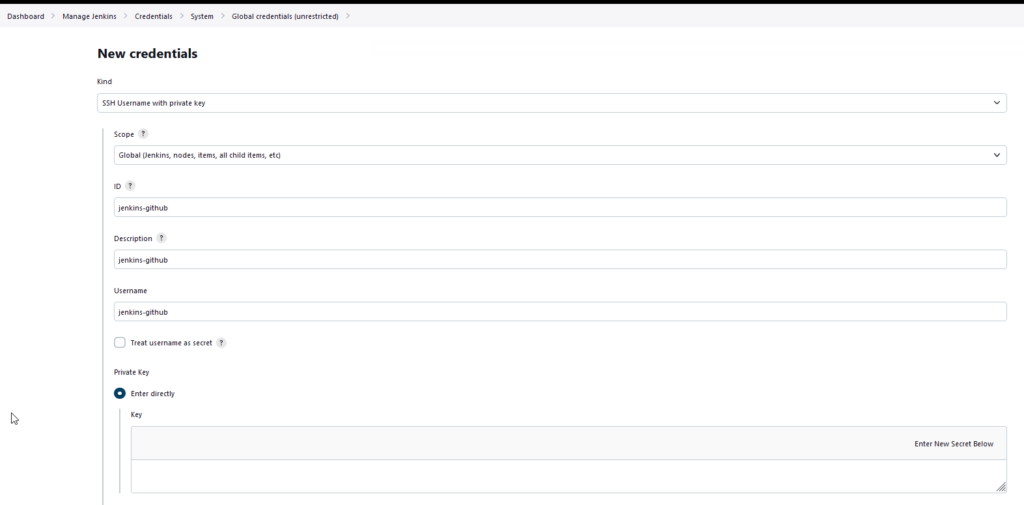
Now, go back to the Jenkins console, click on Manage Jenkins, Credentials and add a new credential, select SSH Username with private key, enter a description for the credential and now paste the contents of the private key generated before.
Jenkins x DockerHub Integration
Similarly as we did to authenticate our Jenkins to our GitHub repository, now w have to do with DockerHub.
Access your DockerHub account, go to Account Settings, Security and then, add a New Access Token, and copy the access token generated.
Go back to the Jenkins console, and add a new Credential, this time, select Username with password, for the username, enter your DockerHub account name and the password, paste the Access Token generated before.

Jenkins Pipeline
Now lets build our pipeline, go back to Jenkins main page and create a new project, and select Pipeline

Scroll down to the pipeline definition, enter the following code adjusting it according to your DockerHub and GitHub repositories.
Also, on the stage (“Try to run the Build”) make sure to adjust the variables according to your environment.
def img
def name
pipeline {
    environment {
        registry = "<your_dockerhub_repository>"
        registryCredential = 'jenkins-dockerhub'
        dockerImage = ''
    }

    agent any

    stages{

        stage("Clean Containers") {
            steps {
                script{
                    sh "docker ps -aq | xargs -r docker rm -f || true"
                }
            }
        }

        stage("Clean Images") {
            steps {
                script{
                    sh "docker image ls -aq | xargs -r docker rmi -f || true"
                }
            }
        }

		stage("Get Git repo") {
            steps {
                checkout scm: [$class: 'GitSCM', branches: [[name: '*/main']], userRemoteConfigs: [[credentialsId: 'jenkins-github', url: 'git@github.com:<your_repository_here>.git']]]
            }
        }

        stage("Build Image") {
            steps {
                script {
                    img = registry + ":1.0.${env.BUILD_ID}"
                    name = "<your_dockerhub_repository>" + "${env.BUILD_ID}"
                    println {"${img}"}
                    dockerImage = docker.build("${img}")
                }
            }
        }

        stage("Try to run the Build") {
            steps {
                sh "docker run -e NETBIOS=contoso -e ADFQDN=AD2016.contoso.local -e USER=service.account -e PASSWORD=WkIr4b4J9M0wOX3u -e BASEDN=DC=contoso,DC=local -d --name ${name} -p 5000:5000 ${img}"
            }
        }

        stage("Check if Container runs Successfully") {
            steps{
                script {
                    sleep(25)
                    def RESULTADO
                    RESULTADO = sh (script: "echo \$(curl --write-out %{http_code} --silent --output /dev/null http://localhost:5000/login)", returnStdout: true).trim()
                    if (RESULTADO != '200') {
                        currentBuild.result = "FAILURE"
                        error "Test failed"
                    }
                }
            }
        }

        stage("Push to Dockerhub") {
            steps {
                script {
                    docker.withRegistry( 'https://registry.hub.docker.com', registryCredential ) {
                        dockerImage.push()
                    }
                }
            }
        }

        stage ('Deploy to Kubernetes Cluster on LAB') {
            steps {
                script {
                  sh "ansible-playbook ansible_playbook.yml --extra-vars \"image_id=${img}\""
                }
            }
        }

        stage("Final Check if K8S Deployment runs Successfully") {
            steps{
                script {
                    sleep(25)
                    def RESULTADO
                    RESULTADO = sh (script: "echo \$(curl --write-out %{http_code} --silent --output /dev/null http://kubemaster:30001/login)", returnStdout: true).trim()
                    if (RESULTADO != '200') {
                        currentBuild.result = "FAILURE"
                        error "Test failed"
                    }
                }
            }
        }
    }
}
As you can see we are using an Ansible Playbook to deploy to the Kubernetes Cluster, so, create a file called ansible_playbook.yml and enter the following:
- hosts: localhost
  tasks:
  - name: Deploy the application
    k8s:
      state: present
      validate_certs: no
      namespace: default
      definition: "{{ lookup('template', 'k8s_deployment.yaml') | from_yaml }}"
  - name: Deploy the service
    k8s:
      state: present
      definition: "{{ lookup('template', 'k8s_service.yaml') | from_yaml }}"
      validate_certs: no
      namespace: default
Create two more yaml files that will be used to deploy the application and service.
k8s_deployment.yaml
---
apiVersion: apps/v1
kind: Deployment
metadata:
  name: rogiwara-deploy
  labels:
    app: rogiwara-app
spec:
  replicas: 2
  selector:
    matchLabels:
      app: rogiwara-app
  template:
    metadata:
      name: rogiwara-pod
      labels:
        app: rogiwara-app
    spec:
      containers:
      - name: rogiwara-container
        image: {{ image_id }}
        env:
        - name: NETBIOS
          value: "contoso"
        - name: ADFQDN
          value: "ad2016.contoso.local"
        - name: USER
          value: "service.account"
        - name: BASEDN
          value: "DC=contoso,DC=local"
        envFrom:
        - secretRef:
            name: ad-svc-account
        ports:
        - containerPort: 5000
k8s_service.yaml
apiVersion: v1
kind: Service
metadata:
  name: rogiwara-service
spec:
  type: NodePort
  selector:
    app: rogiwara-app
  ports:
    - port: 5000
      targetPort: 5000
      nodePort: 30001
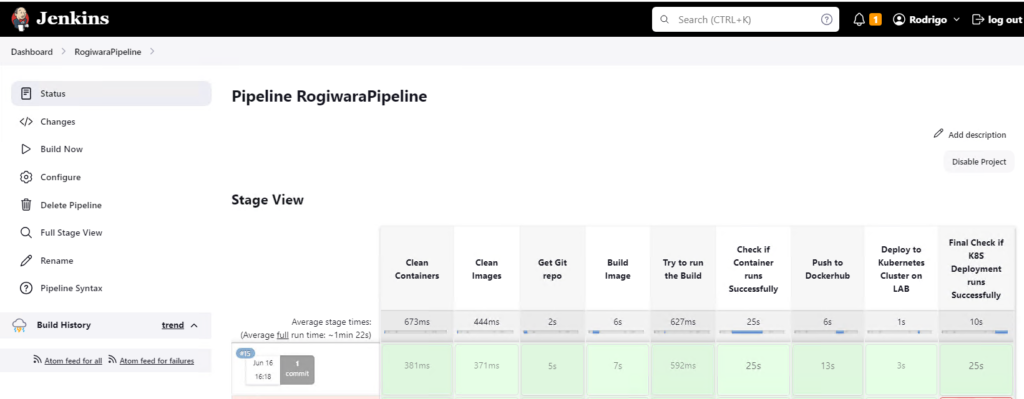
Now, if everything is configured correctly, we should be able to run our pipeline successfully and access your application running on our Kubernetes Cluster.

Thanks for reading!
